Lemon and Elderflower Victoria Sanswich

Lemon cake, sandwiched together with lemon curd and cream, topped with an elderflower glaze.

thumb_DSC06687_1024

It is elderflower season again so I have been making copious amounts of my elderflower cordial. I love using elderflower in baking as its such a beautifully delicate flavour. I decided to use it in something really simple, so I made this lemon and elderflower sponge cake.

thumb_DSC06682_1024

I will be bringing this along to Fiesta Friday#127 this week, hosted by Angie and co-hosted by  Suzanne @ apuginthekitchen and Jess @ Cooking Is My Sport.. Happy Friday Everyone!

thumb_DSC06683_1024

Variations: You could use another citrus fruit to complement the elderflower, both lime and orange would work really well. Also if you don’t like elderflower you could add another floral flavour to the icing like lavender or rose.

thumb_DSC06688_1024

Ingredients: Serves 8-10

The Sponge:

  • 250g butter
  • 250g caster sugar
  • zest of two lemons
  • 4 eggs
  • 250g self raising flour
  • 3-4tbsp elderflower cordial

The Filling:

  • 200ml double cream – whipped
  • 150g lemon curd

The Icing

  • 200g icing sugar
  • 2-5tbsp elderflower cordial

thumb_DSC06685_1024

To Make:

Preheat the oven to 180C and grease and line two 20cm cake tins.

Combine all the ingredients for the sponge and mix with an electric whisk until light and fluffy.

Spoon into the prepared cake tins and level off.

Bake in the preheated oven for 25-30 minutes, until golden brown on top and springy to touch.

Leave to cool on a wire rack.

Once the cakes are cool, place one cake onto a cake stand or serving plate and spread with lemon curd. Dollop the whipped cream onto and gently spread t the edges. Sandwich the next cake layer ontop.

To make the icing, sift the icing sugar into a bowl, and add the elderflower cordial tbsp at time, stop when the mixture has formed a thick paste that coats the back of a spoon.

Pour the icing over the top of the cake, and gently spread to the edges, add a bit at a time, so it doesn’t all just run over the edges. You should end up with a rustic drippy finish tough!

Decorate with some edible flowers (I have used primrose and violas) and serve!

thumb_DSC06691_1024


Butternut Squash Dip with Toasted Hazelnuts

Deliciously sweet and creamy dip made with butternut squash and tahini, topped with toasted hazelnuts.

thumb_DSC06658_1024

This is another lovely dip recipe from Honey & co, which I have been making a lot recently. When I first made this dip I wasn’t sure what to expect as I’ve never had anything like it, but I was not disappointed, it is absolutely delicious, and probably my favourite dip of all time!

Its really easy to make, and makes a great addition to a mezze meal to contrast with the sharp lemony flavours of hummus.

thumb_DSC06660_1024

Variations: You can leave off the hazelnuts if your not keen, or add a different nut, or you could top it with something different all together like a dollop of yoghurt.

Ingredients: Serves 4 as a starter or mezze

  • 1 large butternut squash (600g peeled and deseeded)
  • 1/2 tsp salt
  • 60g tahini
  • 2 tsp honey
  • 30g hazelnuts, toasted and roughly chopped.

thumb_DSC06657_1024

To Make:

Peel and chop the butternut squash into rough cubes. Place in a large pan with a splash of water, cover and cook over a low heat for 10 minutes  – don’t remove the lid or stir in the 10 minutes, you need to keep the lid on so it doesn’t burn!)

Once the 10 minutes is up, remove the lid and stir then replace the lid and leave for another 10 minutes. Repeat this process until the butternut squash begins to fall appart as you stir it.

Once the butternut squash is cooked, keep stiring until it has completely broken down into a puree, then stir in the salt, tahini and honey.

Place in a serving bowl and top with some roughly chopped toasted hazelnuts. Serve with some lovely flatbreads and enjoy!

thumb_DSC06661_1024


Quick and Easy Hummus

Super quick, easy and delicious hummus recipe 

thumb_DSC06667_1024

This recipe comes from one of my favourite cookbooks at the moment; Honey & Co. Ive tried lots of other hummus recipes before, but Ive never found one that tastes as good as this or is as easy! The recipe in the book used dried chickpeas, but I just use a can of chickpeas which means I can have it made in 5 minutes!

thumb_DSC06664_1024

Variations: You can add any extra flavour you want to the hummus, I love using some fresh coriander.

Ingredients: Makes one large bowl full (enough for 4 people as a starter or mezze)

  • 250g can of chickpeas
  • 2 cloves of garlic
  • 125g tahini paste
  • 1/2 a tsp salt
  • 1-3 tbsp lemon juice

thumb_DSC06665_1024

To Make:

Pour the contents of the tin of chickpeas (including the water) in a small pan and bring to the boil.

Turn off the heat and drain the chickpeas into a blender, reserving the cooking liquid. Add all the other ingredients to the blender along with around half of the reserved cooking liquid.

Blend to form a smooth paste (add more liquid if required!). At this point the mixture will be a bit runnier than you would expect but it will firm up in the fridge!

Cover with clingfilm and chill in the fridge for at lest half an hour.

Top with some paprika or cumin and fresh herbs. Serve with some flatbreads and enjoy!

thumb_DSC06666_1024


Spiced Panna Cotta and Mango Mousse Pots

Panna cotta, spiced with cardamom, cinnamon and saffron, topped with a fruity mango and lime mousse.

thumb_DSC06530_1024

thumb_DSC06539_1024


I came up with these desserts when I was trying to decide what to make to finish off an indian meal, so I wanted something light and exotic. I couldn’t decide wether to make a spiced panna cotta or a mango mousse so I just decided to make both!

I actually really liked the combination of the fruity mousse and sweet spicy panna cotta, and they went down well, so I definitely recommend giving them a go!


thumb_DSC06523_1024

thumb_DSC06522_1024

I will be bringing this along to Fiesta Friday#121 this week. Happy Friday everyone!

Variations: You could use a different mousse flavour – lemon or passionfruit would be lovely.

Ingredients: Makes 10 pots

The Panna Cotta:

  • 400ml double cream
  • 200ml milk
  • 60g caster sugar
  • 10 cardamon pods
  • 1 cinnamon stick
  • 1 pinch of saffron
  • 5 gelatine leaves

The Mango Mousse:

  • 2 ripe mangos
  • 2 tbsp honey
  • 250ml double cream
  • juice and zest of two limes
  • 4 gelatine leaves
  • 50ml tropical fruit juice

thumb_DSC06533_1024


To Make:

The Panna Cotta:

Combine the milk, cream sugar and spices in a large pan and bring to almost a boil over a low heat.

Soak the gelatine in some cold water for 5 minutes.

Once the cream has reached almost boiling point, remove from the heat and stir in the gelatine leaves. (Taste and check it is sweet enough for you!)

Once the gelatine has completely melted strain the mixture into small ramekins, until each is half full.

Leave to chill in the fridge for at least 3 hours until set.

The Mango Mousse:

Soak the gelatine leaves in cold water for 5 minutes, then melt in a pan over a low heat with the fruit juice.

Peel and dice the mango, reserving 1/4 for topping the mango mouse.

Place the rest of the mango in a small blender with the honey, and the lime juice and zest. Blend until smooth.

In a clean bowl whip up the double cream until it forms soft peaks.

Fold in the mango mixture and gelatine until fully combined and no lumps remain.

Spoon into the ramekins over the set panna cotta layer. Leave to chill in the fridge for at least three hours.

Top with the diced mango, and a few cardamom pods.

Serve and enjoy!

thumb_DSC06534_1024


Croissants

Home made croissants  with three filings –  chocolate, marzipan or bacon and cream cheese.

thumb_IMAG0568_1024

Who doesn’t love a freshly baked flaky croissant? I was a bit daunted by trying to make my own croissants the first time I made them, but I was pleasantly surprised at how easy they were and how amazing they tasted – they just take a bit of time to make!

I got this recipe from Richard Bertinet’s Crust recipe book. This is the third time I’ve made them, and I’ve had consistently great results each time, so I can definitely recommend the recipe!

thumb_IMAG0573_1024

I have tried out a few different fillings, but my favourites are cream cheese and bacon, marzipan, and chocolate, so I made all three with this batch of dough. These croissants do taste also taste delicious plain though!

This makes quite a lot of croissants, so I usually freeze half as soon as they have cooled down, and then I can get them out when I have people to stay, or if I just fancy an extravagant breakfast!

thumb_IMAG0577_1024

Ingredients: Makes around 12-14 large croissants or 20-24 small.

  • 500g strong white bread flour
  • 20g fast action yeast
  • 10g salt
  • 50g caster sugar
  • 1 egg
  • 125g full-fat milk – warmed to body temperature
  • 125g water
  • 200g unsalted butter (cold)
  • 1 egg (for the egg wash)

thumb_IMAG0569_1024

To Make:

Combine the flour, yeast, salt, sugar, milk and egg in a large mixing bowl. Mix until everything begins to come together.

thumb_IMAG0536_1024

thumb_IMAG0537_1024

Turn out onto a clean work surface and knead for 5-10 minutes until smooth and elastic.

Return to the bowl and slash a cross in the top of the dough with a sharp knife. Cover with clingfilm and leave to prove in the fridge for at least two hours, but preferably overnight.

thumb_IMAG0539_1024

thumb_IMAG0540_1024

Take the dough out of the bowl and place on a lightly floured work surface. Roll out the four corners of the dough into a square.

thumb_IMAG0541_1024

thumb_IMAG0543 (1)_1024


Either flatten the butter into a square using a rolling pin, or slice up into 5-6 thin rectangles.

Lay the butter in the middle of the rolled out dough, and fold in the corners over the butter.

thumb_IMAG0544 (1)_1024

thumb_IMAG0545 (1)_1024

Roll out the dough into a large rectangle, 2-3 times longer than its original length. Try to distribute the weight of the rolling pin evenly, so that the butter is evenly flattened out.

thumb_IMAG0546 (2)_1024

Fold the dough into thirds. Place on a plastic board or oven tray and cover with clingfilm, and chill in the fridge for 30 minutes.

thumb_IMAG0547 (1)_1024

Remove from the fridge and roll out again into a a large rectangle. Fold into thirds and leave to chill in the fridge for 3o minutes for a second time.

Remove from the fridge and roll out again into a a large rectangle. Fold into thirds and leave to chill in the fridge for 3o minutes for a third time.

Remover from the fridge and roll out into a large rectangle, about 30 x 75 x 4mm.

thumb_IMAG0548 (1)_1024

With a sharp knife cut the dough lengthways down the centre to form two long thin rectangles.

thumb_IMAG0550 (1)_1024

Cut each strip into 6-7 triangles. Make a small vertical cut at the base of each triangle roll up each triangle from the base.

Add your chosen filling for the croissants at the base before rolling up.

thumb_IMAG0557 (1)_1024

thumb_IMAG0553 (1)_1024


For the pan au chocolat, cut the dough into rectangles, and roll width-ways three times around a few squares of dark chocolate .

thumb_IMAG0560 (1)_1024

thumb_IMAG0561_1024

Place the croissants on a greased baking tray and graze with the egg wash. Leave to prove for 2 hours.

Preheat the oven to 180C.

Graze again, and sprinkle some flaked almonds over any marzipan croissants.

thumb_IMAG0564_1024

Bake in the preheated oven for 20-25 minutes until golden brown and cooked through – check they sound hollow when you tap the bottom!

Leave to cool on a wire rack before serving.

thumb_IMAG0574_1024


Pomegranate & Hibiscus Jelly

Soft jelly made with pomegranate juice, flavoured with hibiscus flowers and cinnamon.

thumb_DSC06344_1024

I made this jelly to have as a dessert after a curry, so I wanted something light and fruity! I got this recipe from my Sweet Sicily cookbook by Alessandra Damone. Her recipe uses watermelon and jasmine flowers, but I couldn’t get hold of these, so I decided to use pomegranate and hibiscus instead!

thumb_DSC06342_1024

This jelly was really really easy to make, and it had a lovely exotic flavour which finished off our meal wonderfully. Using cornflour and gelatine also gave this a lovely soft set which I find much nicer than if you just use gelatine! I used one sachet of powdered gelatine which is enough to set one pint of liquid, so you could use an equivalent amount of leaf gelatine instead.

They look very impressive once you have added the decoration as well, so they would be a great dessert to impress your friends with!

thumb_DSC06337_1024

Variations: You could probably use any fruit and floral/ spicy favours you wanted in this jelly. I think Rose and raspberry would taste lovely.

Ingredients: Serves Two

  • 500ml good quality pomegranate juice
  • 1tbsp dried hibiscus flowers
  • 40g corn flour
  • 7g  powdered gelatine (enough to set 1 pint)
  • 1 cinnamon stick
  • 200g sugar
  • chopped pistachios, chocolate chips and cinnamon for decoration.

thumb_DSC06339_1024

To Make:

Dissolve the cornflour in 2 tbsp of the Pomegranate juice.

In a large pan combine the remaining pomegranate juice, hibiscus flowers cinnamon stick and sugar. Cook over a low heat until it reaches almost boiling point.

Stir in the cornflour mixture and gelatine, and continue to heat, constantly stiring until the mixture thickens slightly and the gelatine is completely dissolved.

strain into individual ramekins or wine glasses, making sure all the hibiscus flowers and cinnamon stick are removed.

Chill in the fridge for at least 4 hours.

Once set remove from the fridge and decorate with ground cinnamon, chopped pistachios and chocolate chips.

Serve and enjoy!

thumb_DSC06346_1024


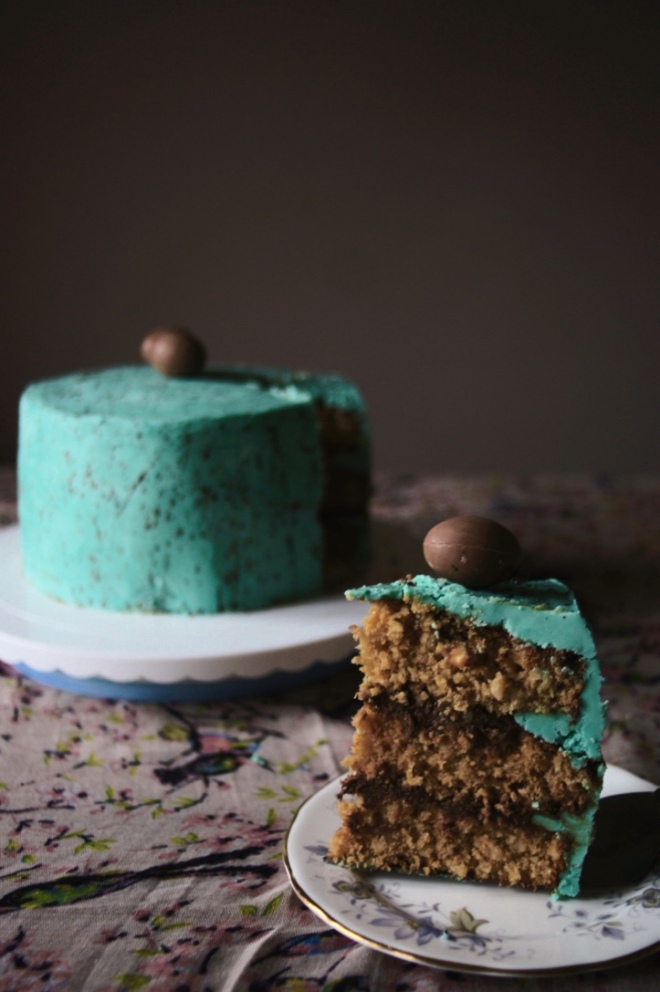
Chocolate and Hazelnut Speckled Egg Cake

Hazelnut cake, sandwiched together with chocolate and hazelnut spread, coated in white chocolate ganache.

thumb_DSC06507_1024

thumb_DSC06479_1024

Easter has coincided with my boyfriends birthday this year, so I decided to make him an Easter themed birthday cake!

I had a browse around on Pinterest and I found these amazing tutorials for making a speckled egg cake, and I think they look fantastic so I decided to try and make one myself.

thumb_DSC06494_1024

thumb_DSC06481_1024

My cake is hazelnut and chocolate flavour, so I have made a hazelnut cake, sandwiched together with chocolate hazelnut spread. I used a white chocolate ganache for the icing so that I would be able to colour it for the speckled egg effect.

thumb_DSC06517_1024

thumb_DSC06490_1024

The speckled egg icing actually really easy and fun! You just ice as normal and then splatter the cake with a cocoa powder paint to give the speckly effect, the kitchen was a bit of a mess though!

I will be bringing this along to Fiesta Friday#112 this week, hosted by Angie and co-hosted by Natalie @ Kitchen, Uncorked and Hilda @ Along The Grapevine. Happy Friday and Happy Easter everyone!

thumb_DSC06482_1024

Variations: you could use any flavours you want in this cake!

Ingredients: Serves 12-14

The Cake:

  • 300g butter
  • 150g soft brown sugar
  • 150g caster sugar
  • 6 eggs
  • 200g chopped hazelnuts
  • 300g self raising flour
  • 150g chocolate hazelnut spread

The Icing:

  • 600g white chocolate
  • 200ml double cream
  • blue gel food colouring
  • 50g cocoa powder
  • chocolate eggs

thumb_DSC06514_1024

To Make:

Grease and line three 23cm cake tins, preheat the oven to 180C.

Cream together the butter and sugars in a large mixing bowl until light and fluffy. Fold in the eggs one at a time followed by the chopped hazelnuts and flour.

Spoon into the prepared tins and bake in the preheated oven for 20-25 minutes until cooked through and golden brown.

Leave to cool completely on a wire rack.

For the white chocolate ganache, melt together the chocolate and cream in the microwave for 30 seconds at a time, until the chocolate has fully melted, then stir in the food colouring until it reaches the desired shade of blue.

Cover with clingfilm so that the top of the ganache is toughing the film. Leave to cool to body temperature for a few hours.

whisk the ganache for a few minutes with a hand-held electric mixer until light and creamy. Cover with clingfilm again and leave to reach room temperature.

Place one of the sponges on an icing turntable. Pipe a ring of ganache around the edge of the sponge, then fill the middle with a few tbsp of chocolate hazelnut spread.  -repeat with the next two sponges.

thumb_IMAG0654_1024

thumb_IMAG0655_1024

thumb_IMAG0657_1024

Cover the outside of the cake with a thick layer of ganache. then use a scraper to straighten out all the edges.

thumb_IMAG0658_1024

Smooth out the ganache by warming up a metal spatula in hot water and then using this to smooth out and unwanted lumps and bumps.

thumb_IMAG0659_1024

Once you are happy with the finish of your ganache you can move on to the speckle decoration!

Mix the cocoa powder with a few tbsp of water until it forms a loose pain like consistency.

Use a clean paintbrush and dip in in your chocolate paint. tap off the excess and then hold the paintbrush with one hand and tap with your fingers to make flecks of pain scatter off the brush – practice on some greaseproof paper before you get to work on the cake!

thumb_IMAG0660_1024

Use the chocolate paint to decorate the top and sides of the cake until you are happy with the speckley effect.

thumb_IMAG0661_1024

Finally decorate with some chocolate eggs and the cake is ready to serve!

thumb_DSC06517_1024

thumb_DSC06518_1024


Rhubarb, Ginger and Soured Cream Cake

Deliciously moist cake, made with fresh rhubarb and soured cream, flavoured with a hint of  warming ginger.

thumb_DSC06476_1024

Now that the beautifully pink stalks of rhubarb are appearing in the shops, I couldn’t resist making a lovely rhubarb cake!

I have used this Waitrose recipe for soured cream and rhubarb cake, which is a lovely simple recipe which makes a really flavourful cake!

thumb_DSC06463_1024

I decided to lay the rhubarb on top of the cake in strips to try and make it look a little bit prettier, but you could also just scatter over some cut up rhubarb!

This was a lovely cake which would be a great dessert with a spoonful of creme fraiche or warm custard.

thumb_DSC06475_1024

Variations: You could use a different fruit in this cake  – apple or pear would work well!

Ingredients: Serves 6-8

  • 75g unsalted butter, softened
  • 250g light brown soft sugar
  • 284ml soured cream
  • 2 medium eggs
  • 3 tsp ground ginger
  • 300g self-raising flour
  • 400g Rhubarb
  • 100g caster sugar

thumb_DSC06473_1024

To Make:

Grease and line a deep 23cm cake tin, and preheat the oven to 170C

Roughly chop about 4/3 of the rhubarb, reserving a few long pieces to cover the top of the cake.

Combine the butter, sugars, ginger, eggs, flour and soured cream in a large mixing bowl and whisk for around 5 minutes until smooth.

Fold in the chopped up rhubarb until it is evenly distributed.

Spoon the mixture into the prepared cake tins. Cut the leftover rhubarb in half lengthways to create long strips, and lay them on top of the cake mix.

thumb_IMAG0646 (1)_1024

Bake in the preheated oven for 1 hour, until golden brown and cooked through. You may need to cover the cake with foil halfway through baking to stop it from burning.

Leave to cool in the tin for 5 minutes, then turn out onto a cooling rack.

Serve warm and enjoy!

thumb_DSC06472_1024


Hanoi Chicken Noodle Soup

Spiced chicken broth flavoured with cinnamon and star anise, with chicken, rice noodles and green beans.

thumb_DSC06453_1024

This is a recipe from Rick Steins Far Eastern Odyssey Cookbook, which I tried out for dinner one night this week. It was absolutely delicious, and made a really simple and healthy weekday dinner!

Ingredients: Serves Two

  • 2 chicken legs, skin removed.
  • 15g ginger  – sliced into rings
  • 2 cloves of garlic, finely chopped
  • 2 star anise
  • 1 cinnamon stick
  • 1/2 tsp black peppercorns
  • 200g chopped green veg   -I used sugar snap peas.
  • 1 large carrot, sliced
  • 150g dried rice noodles
  • 1 chicken stock cube
  • light soy sauce
  • sesame oil
  • 5 spring onions, finely chopped
  • handful of mint leaves
  • handful of coriander leaves
  • red chilli

thumb_DSC06451_1024

To Make:

Place the chicken legs in a large wok, along with the ginger, garlic cloves, chilli, star anise, cinnamon, black peppercorns, spring onions and stock cube. Cover with water and simmer for 30-45 minutes until the chicken is completely cooked through and beginning to fall off the bone.

thumb_IMAG0634 (1)_1024

thumb_IMAG0635 (1)_1024

Soak the rice noodles in hot water, according to the packet instructions.

Remove the chicken legs from the broth and shred the meat off the bone, return the meat to the pan, along with the chopped green vegetables. cook for a further 2-3 minutes until the green veg is cooked.

thumb_IMAG0641 (1)_1024

thumb_IMAG0642 (1)_1024

Taste the broth and season with soy sauce. Then add the mint and coriander.

Strain the noodles and divide between two bowls. Ladle over big spoonfuls of the soup mixture. Finish off with a drizzle of sesame oil and a few extra slices of spring onion and red chilli.

thumb_IMAG0643 (1)_1024

thumb_DSC06445_1024

Serve and enjoy!

thumb_DSC06455_1024


Scandinavian Cinnamon Rolls

Sweet dough twists flavoured with cinnamon and topped with crunchy pearl sugar.

thumb_IMAG0628_1024

I LOVE cinnamon rolls, they are one of my absolute favourite breads.  I’ve made them at home before but I have aways made the american version which are much sweeter and stickier.

I had some scandinavian style cinnamon rolls from a cafe in London before christmas and I absolutely loved them, so I decided to try and make some for myself! I used a mixture of a few different recipes for these.

thumb_IMAG0627_1024

The main difference I noticed between american and scandinavian cinnamon rolls was how the filling was added. In american cinnamon roll,s the sugar and cinnamon are mixed with the melted sugar and then spread onto the bread, so you end up with quite a thick gloopy covering of sugar, whereas the scaninavian rolls all had the melted butter brushed on and the sugar sprinkled over later, so it had a bit of a less intense filling!

thumb_IMAG0630_1024

I also decided to shape these differently, so I had a look online and found this really pretty method for making twisted knot cinnamon rolls.

I really enjoyed these, and I much preferred them to the recipe I usually use so I will definitely be making them again!

Variations: You can use ground cardamom in the filling for a different flavour!

I will be bringing these along to Fiesta Friday 111, hosted by Angie and co-hosted by Naina @ Spice in the City and Julianna @ Foodie On Board.

Happy Friday everyone!

thumb_IMAG0625_1024

Ingredients: Makes 12 Rolls

  • 500g strong white bread four
  • 10g yeast
  • 10g salt
  • 50g caster sugar
  • 1 egg
  • 250 warm milk
  • 50g butter, melted
  • 150g soft brown sugar
  • 2 tsp ground cinnamon
  • 100g icing sugar
  • 1-2tbsp water
  • pearl sugar


To Make:

Combine the flour, yeast, salt, sugar, milk, eggs in a large bowl and mix until it forms a rough ball of dough.

Turn out onto a clean work surface and knead until smooth and elastic. Return to the bowl and leave and prove for 1 hour, until doubled in size.

Combine the sugar and flour

Turn out onto a floured work surface and roll out into a large rectangle about 1cm thick.

thumb_IMAG0609_1024

thumb_IMAG0610_1024

Brush all over with the melted butter, making sure the mixture reaches right to the edges.

thumb_IMAG0611_1024

Scatter over the cinnamon sugar mixture and spread up to the edges.

thumb_IMAG0613 (1)_1024

Fold into thirds, and cut into 12 strips

thumb_IMAG0614 (1)_1024

thumb_IMAG0615 (1)_1024

thumb_IMAG0616_1024

Take each strip and stretch and twist into a long spiral. Wrap the strip twice around your fingers and tuck the ends into the bottom forming a knot.

thumb_IMAG0617_1024

thumb_IMAG0618_1024

thumb_IMAG0619_1024

thumb_IMAG0622_1024

Place on a greased baking tray and cover with clingfilm. Leave to prove again for an hour until doubled in size.

Preheat the oven to 180C

thumb_IMAG0623_1024

Bake in the preheated oven for 15-20 minutes until golden brown. Leave to cool on a wire rack.

Mix together the icing sugar and water until the mixture forms a loose glaze-like consistency. Brush the glaze over the rolls, and scatter over some pearl sugar.

Serve and enjoy!

thumb_IMAG0632 (1)_1024